

An Advanced 5-Minute Setup for SPX and SPY Zero DTE Options Trading
This paper covers an advanced setup that combines several concepts you already know. It builds on the QZ Candle Control indicator and the new Smart Money Gaps engine.
This setup runs on the 5-minute chart. I read the structure in 5min, then drop down to the 1min or 15-second chart for execution if you hold those licenses.
Smart money has two entries at every gap zone. The formation entry, and the revisit entry. This paper covers the revisit entry. The formation entry is covered in a separate article on Coffee With Q (linked below).
I would read the whole thing once before trading it. The sequence matters.
Skip a step and the edge disappears.
What This Strategy Uses
The setup stacks five concepts. Each one filters the next.
- Breakout and Breakdown
- Smart Money Gaps (SMG)
- Retest
- Price action plus Smart Money concepts
- Candle reading (very important)
When I skip the candle reading, the rest of the setup falls apart. I will show you why below.
Breakout Explained
Price crosses a resistance level and closes above it. That is a breakout.
I would not enter the moment price breaks through. I would study the move first. I wait for the confirmation candle, the one that closes above the breakout high.
Most traders buy after this confirmation. The accuracy is mediocre. I want more filters before I pull the trigger.
Breakdown Explained
Price drops below a support level and closes lower. That is a breakdown.
Confirmation comes when the next candle closes below the prior low.
Same idea here. I do not short on confirmation alone. The accuracy is average at best. I want the SMG and the retest to clean up the entry.
Smart Money Gaps and How Candle Control Helps
A Smart Money Gap (SMG) forms when price moves so fast that a 3-candle pattern leaves an imbalance. Smart money pushed price aggressively in one direction. They did not transact at every level on the way through.
The orders that wanted to fill in that zone are still resting there. Those orders act like a magnet. Price tends to come back and fill the gap.(Stud QZ Magnets and GAPS)
EXAMPLE
Here is a simple way to think about it. Smart money wanted to buy 100,000 shares. They got 50,000. The gap is the inventory they missed. They will come back to that price to collect what they missed. The question is how and when.
Smart Money Has Two Entries. So Do We.
This is the part most traders miss. At every SMG zone, smart money is active twice. Two visits. Two entries. Two opportunities.
Entry 1: The Formation
Smart money creates the gap in real time. Aggressive candle, high volume, the imbalance forms in front of you. I catch this entry by reading price and volume as it happens.
I covered this read in detail on Coffee With Q. If you want to study how I detect smart money accumulation in real time, read it here:
How Smart Money Accumulates Before a Move
Entry 2: The Revisit
Smart money comes back to collect the inventory they missed. This is the breadcrumb trade. The SMG zone is already drawn on my chart. I see it. I wait for price to return. I read the rejection candle. I take the trade alongside them.
This paper teaches Entry 2. The breadcrumb makes it the easier of the two reads. The chart does the memory work for you.
How QZ Candle Control Marks the Breadcrumb
QZ Candle Control draws the SMG for you on two timeframes:
- 5-minute SMGs use solid yellow and white horizontal lines
- 15-minute SMGs use dashed cyan and purple horizontal lines
The volume number inside the gap zone tells you the conviction behind the move that created it. Big volume means real institutional footprint. Small volume means retail noise.
When a gap fills, the box shades semi-transparent so you have a clear visual record of which gaps got worked and which ones are still in play.
Why This Matters
Most indicators draw every gap. We track the active ones for you in the SMG Watch Table.
Open the chart in the morning. Glance at the table. See your bull magnets below price and bear magnets above price. Those are your levels for the session.
15m levels carry more weight than 5m levels. Anchor your bias to 15m gaps.
The Retest Concept
The retest is one of the strongest price action ideas in trading.
Here is the sequence:
- Price breaks out or breaks down
- An SMG forms in the direction of the move
- Price comes back to the SMG zone
- Price gives a strong reaction off the level
That reaction off the SMG is your entry signal. Not the breakout. Not the gap formation. The retest reaction.
The Setup Anatomy
The chart below shows both directions on the same SPY 5min session. Left side is bearish. Right side is bullish.
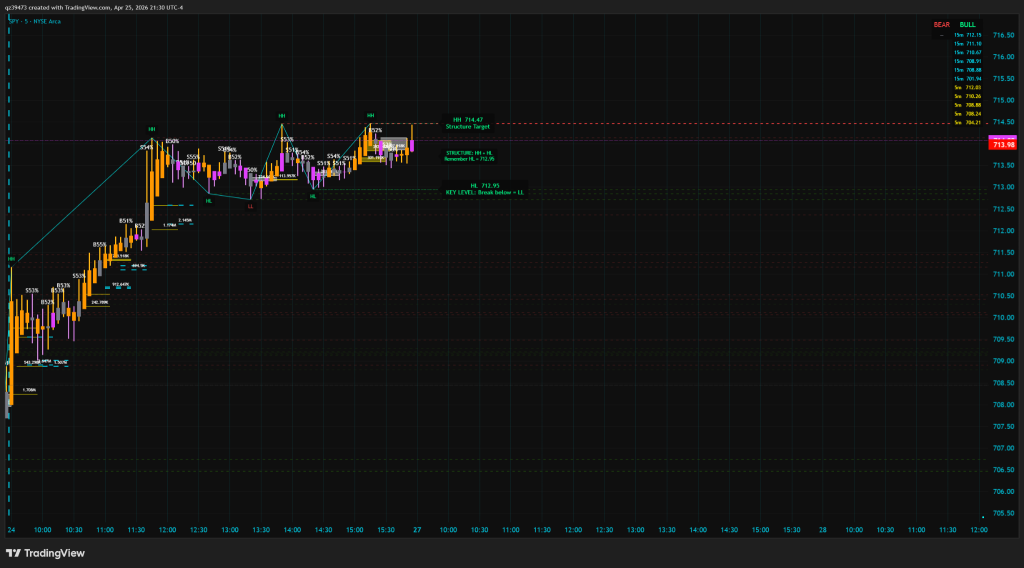
SPY 5min. Left: breakdown into bear SMG, retest, short. Right: breakout from bull SMG, retest, long.
Bullish Setup Playbook
Step 1: I wait for the breakout
Price closes above resistance with a confirmation candle. I do not jump in here. I sit on my hands and let the next steps develop.
Step 2: I watch for the SMG to form
As price runs higher, I watch for the 3-candle imbalance pattern below price. The 5m bull SMG draws yellow horizontal lines. The 15m bull SMG draws cyan dashed lines.
Step 3: I wait for the retest
Price needs to come back down and tag the SMG zone. I stay patient. I have watched many traders front-run the retest and get stopped out.
Step 4: I read the candle
Once price is in the SMG zone, I read the candle. I am looking for a bullish rejection candle that tells me the level held.
Step 5: I run my checklist
I pull up my decision table and the QZ ALGO checklist. I confirm structure, I confirm momentum, I confirm levels. If the boxes are checked, I take the trade.
Bullish Trade Management
Entry: confirmation candle off the SMG retest
Watch the gap fill from open lines to shaded boxes. The shading is your sign the gap got worked.
First move up was the imbalance. The second move is them filling to collect the missing inventory.
Stop loss: below the SMG zone (the gap bottom)
Target: next 15m bear SMG above price, or recent swing high
Bearish Setup Playbook
Step 1: I wait for the breakdown
Price closes below support with a confirmation candle. I sit and watch. I do not chase.
Step 2: I watch for the SMG to form
As price runs lower, I watch for the 3-candle imbalance above price. The 5m bear SMG draws white horizontal lines. The 15m bear SMG draws purple dashed lines.
Step 3: I wait for the retest
Price needs to come back up and tag the SMG zone. I hold my patience here.
Step 4: I read the candle
Inside the SMG zone, I read the candle. I am looking for a bearish rejection candle that tells me the level held.
Step 5: I run my checklist
Decision table and QZ ALGO checklist again. If everything aligns, I take the short.
Bearish Trade Management
Entry: rejection candle off the SMG retest
Watch the gap fill from open lines to shaded boxes. The shading is your sign the gap got worked.
First move down was the imbalance. The second move is them filling to collect the missing inventory.
Stop loss: above the SMG zone (the gap top)
Target: next 15m bull SMG below price, or recent swing low
Why This Setup Works
A breakout alone has weak edge. A breakout with an SMG retest and a rejection candle has serious edge. Here is why.
- The breakout proves direction
- The SMG proves smart money was active
- The retest proves price respects the level
- The rejection candle proves the level held in real time
Four confirmations stacked on top of each other. That is what separates this from the standard breakout trade.
Common Mistakes I See
- Entering on the breakout candle (too early, no edge)
- Skipping the retest because of the fear of missing the move
- Ignoring the candle read inside the SMG zone
- Trading SMGs in chop or no-structure conditions
- Stops too tight inside the SMG instead of beyond it
- Forcing a 5m SMG trade against a clean 15m SMG in the opposite direction
Putting It Together
When I open my chart in the morning, I check the SMG Watch Table on the right side of the screen. I see my bull magnets below price. I see my bear magnets above price.
I mark the 15m levels first. Those are heavy. Then I mark the 5m levels.
I wait for price to engage one of those zones. Then I run the playbook above.
This is not a high-frequency setup. I take maybe one or two of these per session. The accuracy makes up for the patience.
Trade what you see, not what you feel. Numbers do not lie. Smart money leaves footprints. We track them for you.
I’m teaching you to think.
DISCLAIMER
This is not investment advisory. I’m not calling trades. I’m teaching you to think. Trading futures and options involves substantial risk of loss and is not suitable for all investors. Past performance is not indicative of future results. The IKIGAI Algo and any associated indicators, tools, or educational materials are provided for informational and educational purposes only and do not constitute financial, investment, or trading advice. You should consult with a qualified financial advisor before making any trading decisions. Q Levels and affiliated parties are not registered investment advisors, broker-dealers, or financial planners. By participation, you acknowledge you are solely responsible for your own trading decisions and any resulting gains or losses. Please trade responsibly and only risk capital you can afford to lose.
Candle Control is a proprietary tool developed by Qamar Zaman and it is being used for teaching the IKIGAI SPX masterclass. https://www.coffeewithq.org/gp/
Batch 6 Class Schedule for May
EST (Eastern Standard Time)
May 9 Saturday 11 – 1 : 2 Hours
May 12 Tuesday – 4 : 2 Hours
May 14 Thursday 2 – 4 : 2 Hours
May 18-21 Monday – Thursday 8 Hours